Minimalist album design and creating the official bootleg

Minimalist Design and the official "bootleg"

Kanye West’s sixth studio-album, entitled Yeezus, officially debuted on June 18th after being leaked on the internet for about a week. The album’s minimalist casing and cover-art, or lack thereof, has sparked many conversations and interest since images of the packaging appeared online. Although Kanye West acted as his own art director for Yeezus, he is not the first artist to release a project with a minimalist, almost-bootleg feel to the final packaging. Here are a few examples of where the “less is more” philosophy has been fully embraced, starting with Yeezus for reference:

Yeezus, Kanye West (2013)

Kanye West - Yeezus

Despite being widely-known for his ego and ostentation, Kanye West chose to go with a humble design for his latest album’s packaging. Yeezus is pressed on a silver disc with no labels except for some small, inconspicuous text that wraps around the edges and provides the album’s credits. The disc is enclosed within a clear jewel case that is devoid of any art or labels except for a “Parental Advisory” warning and a red sticker that seals it closed. Kanye West was not the first artist to have his work released in this type of modest packaging, but he is credited with the design for Yeezus and could possibly earn himself a “Best Recording Package” Grammy later next year.

The Beatles, The Beatles (1968)

The White Album

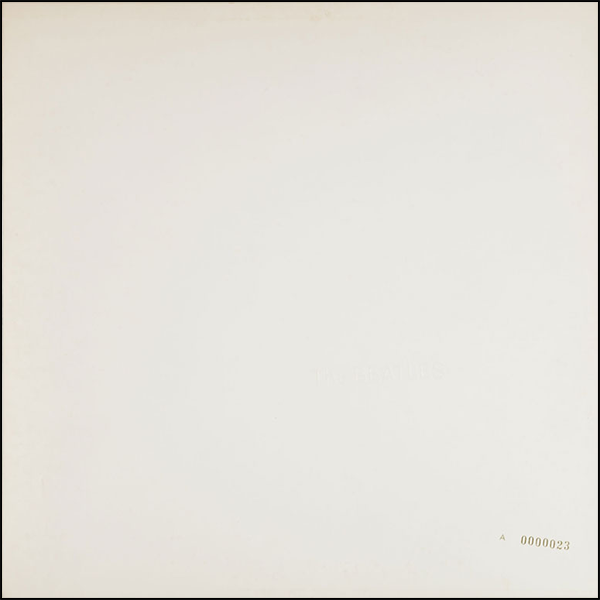
The famous packaging of this self-titled work by The Beatles has led it to be commonly referred to as “The White Album” since its release on November 22, 1968. The record came enclosed in a pure white sleeve that lacked any title or credits, only having a serial number stamped into a corner on one side (and later, the album title embossed into the paper). Although this is not necessarily an example of an official release trying to appear like a bootleg, it is similar to the packaging of Yeezus in its minimalism and the great amount of intrigue that its design created.

Steal This Album!, System of a Down (2002)

Steal This Album!

During a time when file-sharing and digital content piracy was becoming widespread and extremely common (Apple introduced the first-generation iPod in 2001), System of a Down released Steal This Album! on November 26, 2002. The album’s title refers to a book written by Abbie Hoffman in 1971 entitled “Steal This Book” and is supposedly a response to the band’s disappointment in fans listening to leaked copies of their new music before it was released in stores. The album was pressed on a white disc that had the band’s name and album title in a font that looks like it was hand-written in permanent marker and is enclosed by a blank jewel case without inserts or any more information. The packaging was intentionally designed to mimic the appearance of a CD-R that a person would use to copy and listen to pirated music with.

The Girl with the Dragon Tattoo, David Fincher (2011)

The Girl with the Dragon Tattoo

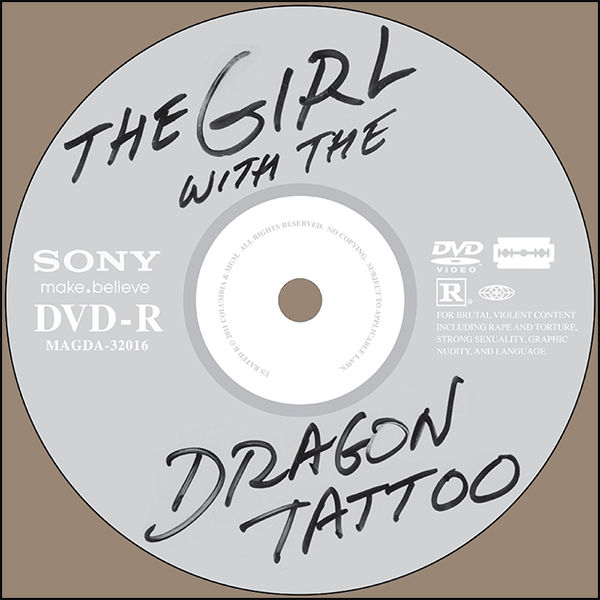
Although this is an example of a film, the 2012 DVD-release of The Girl with the Dragon Tattoo utilized a similar aesthetic of the previously-described albums. The film comes on a silver Sony DVD-R disc that has the title strewn across it in a hand-written, permanent marker typeface that is not unlike that of Steal This Album! The design of the disc is a reference to the hacker protagonist in the film and managed to cause so much confusion for customers that retail outlets like Amazon had to release reassuring statements that it was the official art.

Borat, a 2006 mockumentary from Sascha Baron Cohen also used a similar packaging style for comedic effect and to maintain a low-definition quality that is present throughout the film.

What would Yeezus do?

Yeezus, and the other projects discussed here are just a few releases that have used a bootleg-like aesthetic, but I’m sure there must be plenty more cases of it in music, films, and other areas of art and design. If you’re aware of any other notable examples, please let me know!

Previous Articles:

Handmade music and why it’s crucial in the digital age

How the biggest electronic acts play their music live

Handmade music and why it’s crucial in the digital age

Making your music and merchandise by hand will make you stand-out.

Despite the fact that mp3 players have become the go-to choice for music consumption, handmade CDs and other products can really make your music stand-out from the crowd. The availability of music today has unfortunately caused it to become somewhat disposable and listeners’ attention-spans are shorter than ever; creating your own CDs by hand can help make your music memorable and turn it into a piece of art that people can treasure. Pass these out at shows, give them out in limited runs, or just keep them yourself as a memento for the hard work that went into making the album. Just a note – creating your own album designs by hand will take a lot more time and and resources than simply burning a disk, but in the end I believe it’s worth it to treat your music like the art that it is. Here’s some ideas on how to make your own CDs and merchandise:

Paint your CDs

Blank CD-Rs can be bought by the 100-pack for around $20, and most modern computers have disk-burning capabilities, so it’s really not unreasonable to make your own releases if you want to. You can even get blank CD-Rs that have a white label on top that is perfect for painting and drawing.

Mikey's Imaginary Friends - an example of tasteful design on an independent CD.

This album Mikey’s Imaginary Friends was made with some light passes with a couple different colors of spray paint and a silver Sharpie.

Once you have some blank disks, get some paint markers or a couple spray cans and go nuts – but here are a few important rules that I’ve learned to follow:

  • Do all your painting before you burn your music on to the disk – this way, you can be sure that your CD will still function with the designs you put on it. If you accidentally painted on the bottom of the CD, then you’ll find out now and not after you spend the time burning your music to it.
  • Be conservative with whatever you put on the CD – disk-readers are fine-tuned and will not play a CD if it’s too thick or heavy. It could also be possible that your disk might stick inside of a player if you’ve applied too much paint (this has happened to me before!). Sometimes just writing you/your band’s name and the name of the album on the disk is the best bet and will still look awesome.
  • Make a decision on whether you want to burn your music as an Audio CD or an MP3 CD – I normally choose to burn mine as MP3 so that people can easily put my music on their laptops and iPods, but they frequently have problems playing in older car stereos that don’t support anything but audio tracks (and a lot of people LOVE listening to music in their cars).

Make custom CD Sleeves

CD Sleeves can provide you with a space to make some really cool designs for your music. You can get thick cardboard sleeves for around the same price as a spindle of blank CD-Rs (about 100 for $20) and they will be able to take on paint while looking sturdy and professional. If you want to draw something, think of a simple logo or picture that represents what your music is about and put it on each of your CD sleeves. In some cases, a minimalistic cover with the album’s name on it is a good look; it’s really up to what kind of aesthetic that you’re trying to create and how you want your music to be framed.

Jred Smyth's Somewhere Between album art uses a simple drawing to get its point across.

The album art for Jred Smyth’s Somewhere Between consists of a creature made entirely of black marker – a great example of simple design that portrays a cool and custom feel.

I prefer to use spray paint for almost every kind of painting I do, but there’s really no limit to the types of tools that you can use on your album covers. Make a stencil, use a paintbrush, go crazy – treat your album covers like a canvas and use them as a way to represent yourself and your music.

The deejersEP album art created with many different colors of spray paint.

These versions of the deejersEP were painted with a touch of spray paint and a custom stencil.

If you have some artistic friends (and even if you don’t), give them a stack of blank sleeves and ask them to get creative. Sometimes random and crazy drawings make the best album art and your friends might love taking up the challenge in their free time.

This version of the deejersEP was painted by the homie Juan Aguado.

I’m very fortunate to have some talented friends who are willing to share their skills. This copy of the deejersEP was painted by hand and outlined with permanent marker.

Creating your own stickers

If you can find some stickers that you don’t really want or have a use for, then you can turn them into your own stickers relatively easily. You can use packing slips, blank labels and name tags, or anything else that has adhesive on one side – a lot of these are thrown away as trash every day, so keep your eyes open at post offices and other establishments that might have them.

deejers.com stickers - from blank to finished product.

Here is what I do to make my own stickers out of existing ones, although you may be able to find your own method and style:

  1. Take a can of spray paint of a color that you like (with a large cap if you have one) and paint over all the stickers until you can’t read the text or see the images that were previously on them. Let the paint dry for an afternoon or two – the longer you let the stickers sit, the easier they will be to work with.
  2. Make a small stencil or take a paint marker, paint brush, or anything else you want and start creating. Now that you have some blank stickers that are a color of your choice, you can start having some fun and making whatever type of sticker you’d like.
  3. After everything dries sufficiently, you might have some excess paint that is on the paper that the sticker is on, but not on the actual sticker itself. You can choose to leave this, but it is usually messy and a hassle when you want to actually peel the sticker. This is because most stickers come on some type of wax-like paper and the paint can chip and smear on this part – this is actually a good thing, because you can easily remove the extraneous paint with one of your nails or a scalpel and have a very clean-looking finished product.

Posting Flyers

deejers flyer - use bright colors and large text for the most effective flyers.

Flyers can be a great way to publicize your music or shows in a creative way – posting them on bulletin boards and being that annoying guy handing out advertisements on the sidewalk can help spread the word about your work to your immediate community. Make something interesting, use bright colors, and make sure you post your flyers in places with heavy foot-traffic. Getting a massive amount of flyers can be costly, especially if you want multiple colors or glossy paper, but never underestimate the power of the lone pamphleteer.

Print Business Cards

deejers business cards displaying all social media and contact information.

You can have your own business cards printed for relatively cheap and they’re a great way to share your contact information and where to hear your music.

Making your own business cards will allow you to give someone a quick reference guide of how to reach you or hear the music you’ve made. I wouldn’t recommend making your own cards just because they are surprisingly affordable to have made by a printing company and you can still create your own custom design to be printed. Treat them like miniature flyers and give them out to anyone who asks about your work – they can be a valuable resource to have in your pocket.

or Have Them Professionally Made

There are businesses that exist that can create any one of these things that I’ve discussed in this article; to use them might even be cheaper and it will almost definitely save you time. Depending on your skill sets and how much effort you put in, your products might even look better if they’re professionally made. Weigh out your options and decide what’s realistic for you, but remember this: the point of creating your own CDs is to present yourself and your music in a way that won’t just get lost in the rest of the noise. Treating your album releases and merchandise as extensions of your art will allow you to create your own aesthetic that is unique and memorable.

Previous Articles

How the biggest electronic acts play their music live – a look into how some big names play their sounds in a live setting.

Get Mobile! – Mobile apps and how they can be used in your studio.

Take Control! – Controllers and why they are important to a digital musician.

Give Your Studio Some Life – The components of a basic home studio.

Choose Your Music’s Workplace – What a DAW does and how you can use one to make music on a computer.

How the biggest electronic acts play their music live

Cartoon Banner

So far we’ve talked about digital audio workstations, basic components of a home studio, MIDI controllers, and even mobile apps and how they can fit into your creative process for making music. With Ultra Music Festival wrapping up this month, I figured it would be appropriate to talk about how some of the most technology-heavy music producers in the world utilize these technologies to create their sounds during a live performance.

Here are a few names you might recognize and which devices they use during their live shows:

Skrillex

Electro House, Dubstep

Skrillex, a former post-hardcore singer/songwriter, began creating digital productions and has been a major contributor to bringing electronic music back into the mainstream. Having been nominated for a total of eight Grammy awards and leaving with six, Skrillex is showing no visible signs of slowing down. Here’s what his live rig looks like:

Skrillex's Live Setup

Although not widely known as the most technically-skilled artist, Skrillex has gained massive success and helped bring modern electronic music into the popular culture. (From left to right: M-Audio Trigger Finger, Apple MacBook Pro, & Pioneer DJM-800 Mixer/MIDI Controller.)

Where you can hear Skrillex: Skrillex’s Official YouTube Channel

Flying Lotus

Experimental Electronic, Hip Hop

Flying Lotus comes from Los Angeles, California and proves how enormous sounds can be made on a small laptop. You might have heard his beats in-between cartoons on Adult Swim or you might not have heard of him at all – either way I suggest you check out Flylo. If you are fortunate enough to see him play live, here is what you’ll most likely see lying in front of him:

Flying Lotus' Live Setup

Flying Lotus utilizes technology while still maintaining a very organic and human feel to his music – a lot of this is due to his practice of recording and playing beats without any computer correction or editing. (From left to right: M-Audio Trigger Finger, monome 40h, Apple MacBook Pro, & Novation ReMote 25SL Keyboard.)

Where you can hear Flylo: Flying Lotus’ Official Website

Bassnectar

Breakbeat, Drum & Bass, Dubstep

Bassnectar aka DJ Lorin hails from Santa Cruz, CA and has been playing his electronic music in huge live settings for over a decade. In the last few years he has become known for putting on insane live shows and playing his loud, bass-heavy music to the masses. If you’ve seen Bassnectar live and had a second to stop dancing and look his way, then you would’ve seen him headbanging in front of these:

Bassnectar's Live Setup

Bassnectar chooses to dual-wield Apple MacBook Pros and M-Audio Trigger Fingers during his bass-heavy shows – this allows for the creation of more complex sets and improved reliability in the case of something going wrong.

Where you can hear Bassnectar: BassnectarLabs YouTube Channel

Pretty Lights

Electronic Funk, Hip Hop, Dubstep

Pretty Lights comes from Colorado and brings some incredible funkiness into the broad genre that is electronic dance music. If you’re ever able to look away from the light show that accompanies his live performances (and gives him his name), then you’re going to see Pretty Lights jamming on a variety of controllers:

Pretty Lights' Live Setup

Pretty Lights has embraced technology as a means of creating his music. For live shows, he connects two Akai MPD32 drum pads and an 8×16 monome grid controller to two Apple MacBook Pros and gets funky.

Where you can hear Pretty Lights: Pretty Lights Music

deadmau5

Progressive House, Electro House, Trance

deadmau5 is a Canadian producer of the electronic music genres of House and Trance, and has become a household name because of his extravagant live shows and signature mouse-head. An innovator (and cynic) of live electronic performances, deadmau5 is not afraid to take advantage of any and all technologies available to him:

deadmau5's Live Setup

deadmau5 has some of the most spectacular live shows in the world, and he uses an incredible amount of technology to make them happen. (From left to right: 16×16 monome, Native Instruments Maschine, JazzMutant Lemur, Apple MacBook Pro, & Pioneer EFX-1000 Controller.)

Where you can hear deadmau5: deadmau5’s Official YouTube Channel

Daft Punk

French House, Electro House

Daft Punk is a mysterious duo of robotic Frenchmen that have been pushing the limits of electronic music since their formation in the early 90s. In 2007, they went on tour with a new, and very complex, live set-up that used an impressive amount of technology. If you were somehow able to get inside the Daft Punk “pyramid” on their Alive tour, then you would have seen them working in a futuristic cockpit consisting of these devices:

Daft Punk's Live Setup

The robotic duo known as Daft Punk has long been an innovating force in electronic music; receiving multiple awards and becoming a huge influence on electronic artists and music today. For their Alive 2007 tour, they created a stunning live performance using a variety of devices and controllers. (Top row: Daft Punk’s “Super Computers.” Bottom row: 2 Behringer BCR2000 Controllers and 2 JazzMutant Touchscreens.)

Where you can hear Daft Punk: Daft Punk YouTube Artist Page

That’s a lot of buttons and knobs.

Now you have an idea of how a few of the best producers in the world have decided to use the available technologies to create and play their music. If you’re overwhelmed by these diagrams or eager to buy all the devices you see in them; don’t be. These artists have built their live setups as their music has matured and required it – remember that getting a rig like Pretty Lights will not make you sound like a professional unless you truly know what you’re doing. On the other hand, putting on a giant mouse-head like deadmau5 or being born a french robot like Daft Punk seems to help…

Update

Since I wrote this article, I’ve been fortunate enough to talk to many people about the different live set-ups these artists utilize and learned a lot about how they’ve played their most recent shows. Technology moves very quickly, and the top acts evolve with it and change as well. Here are some updates:

  • Skrillex ditched the Trigger Finger + Ableton Live combo and now plays 4 Pioneer CDJs.
  • Bassnectar replaced the twin Trigger Fingers with a pair of Custom 60Works Controllers…so cool.
  • Pretty Lights is still using two MacBook Pros, but he has simplified his live rig to a single Akai MPD-32.
  • deadmau5 has changed his live set up entirely, and now has a veritable studio in his cube, decked out with multiple synthesizers, a 24-track mixer, 2 Native Instruments Kontrol X1 Controllers, various hardware effects, and a few more bits that I need to research further.
  • Daft Punk has a new album on the way, so we all must wait very impatiently to see how they choose to play their new sounds in a live setting.

Thanks to everyone who discussed these topics with me, I appreciate your help!

Past Articles:

Get Mobile! – How mobile apps can become an active part in your studio and your creative process.

Take Control! – What MIDI controllers are, what they do, and why you should consider using them.

Give Your Studio Some Life – The different components of a simple, but very powerful home recording studio.

Choose Your Music’s Workplace – What digital audio workstations do and a bit on the popular options for DAW’s that exist.

Get Mobile!

The mobile app industry has exploded since the debut of the iTunes App Store five years ago. No matter what operating system your mobile device runs on, there are available applications to help you improve your process for making music (or just have fun messing around). For the sake of brevity, I’ll talk about a few options that are available to iOS users that will allow you to make your mobile device an active part of your studio and creative process (If you use an Android or any other platform, don’t feel left out; there are similar choices available to you as well). These different apps can turn a phone or tablet into an amazing tool for making music whenever the creative inspiration happens.

In my last post, I discussed a few types of controllers that can be used for producing music electronically – thanks to mobile apps, a single device has the ability to fill the roles of a variety of these controllers or instruments. Depending on your needs and preferences, it could just be a better idea to invest in a large tablet device and a few applications rather than buying multiple controllers. After reading a bit more, you can make a decision on which route you should take with your studio.

Apps on Apples

If you have an iPad, then you have an extremely powerful tool for digital music production lying in your hands. The large touch-screen, portability, and the variety of available apps will allow you to do a lot of cool stuff for music production. Like I said before, an iPad (or Android tablet) could replace every one of the controllers that I described in my previous post because of the different available apps that were designed to serve their functions.

But even if you don’t have the iPad and its large display, its little brother can still do just as much and is even more portable. Apple’s iPhone is responsible for about a quarter of all mobile phone sales in the world and they come with over 800,000 apps that are currently available for purchase in the iTunes App Store. There’s an amazing amount of these apps that were designed for music production, but I’ll just focus here on a few types of them.

DAWs:

Garageband for iPad

Garageband shown here running on an iPad – having a mobile workstation empowers you anywhere you are. (Courtesy of flickr user aforgrave)

Remember some of the software that I described in my first post? A couple of these are available in mobile form, and many others exist so that your musical ideas can be captured anywhere at any time. Last month, Steinberg released their popular Cubase DAW in a mobile version called Cubasis and Apple’s Garageband has been available and affordable for a few years now. These types of applications are extremely useful because they provide you a mobile workplace where you can create and save your ideas no matter where you are. I wouldn’t recommend these for doing full projects or as a main DAW, but they are a great resource for producing while you’re on the bus or during a boring TV show.

Examples: Steinberg Cubasis, Apple Garageband, Propellerhead Figure

Instruments:

Moog Filtatron App

The Filtatron App developed by Moog emulates one of their famous hardware synths – turning your mobile device into an elegant digital instrument. (Screenshot courtesy of flickr user Alvaro Farfan)

These types of apps will turn your device into a playable instrument such as a synthesizer or a drum set. There are many keyboard apps available, and many of them have MIDI capabilities that can connect to your studio. I’m sure an experienced pianist or drummer would hate these because of how they feel to play, but they’re great for jamming a few quick melodies or sketching down some MIDI sequences to improve later. There are also many apps that emulate grid-style controllers, drum pads, and mixers. The ability to control an app by the device’s touch-screen makes using digital faders and knobs on a mixer application extremely fun and powerful.

Examples: Moog Filtatron, Korg iMS-20 (iPad Only), Liine Lemur, AppBC touchAble (iPad Only for Ableton’s Live DAW)

Hardware:

Alesis iO Dock

This iO Dock by Alesis gives the iPad the ability to communicate both MIDI and audio data and become a full-fledged mobile studio. (Courtesy of flickr user jochenWolters)

If you want to integrate your phone or tablet as an active part of your home studio or make it a hub for your other devices, then it is important to get some hardware in order to do so. You will need to get adapters such as a MIDI or a guitar interface that will allow you to hook your device into your studio or to connect your instruments to your mobile apps. These interfaces simply hook into your iPhone’s 30-pin dock connector or the new Lightning port and provide you with inputs and outputs for communicating MIDI or audio data. Once you have this connection, you are ready to treat your mobile device as a new component in your music studio or as a recording hub for your other devices.

Examples: Line6 MIDIMobilizer, IKMultimedia’s Variety of iRig Devices, Yamaha iMX-1 MIDI Interface, Alesis iO Dock

Find what works for you.

These types of apps can transform your phone or tablet into an active part of your main studio or even give you a separate environment to work with while you are away. Like I’ve said with all my recommendations, choose which apps or devices you think will best complement or contribute to your creative process. It’s possible that you may find mobile devices frustrating and hard to work with, and there is nothing wrong with that conclusion. However, inspiration happens at random times and places, and a mobile device with a couple great apps on it can allow you to capture it when it strikes. Choose an app or two that work for you and you will have a powerful musical creation tool at your disposal at all times.

Take Control!

Express Yourself

So now that we have our DAW and some basic hardware, it’s time to start thinking about how you’d like to communicate with your computer and its software. A QWERTY keyboard is nice for writing this blog post, but it won’t be my weapon of choice when I want to work on music. Peripheral devices, also known as controllers, will allow you to have a tangible instrument to play with while working in a mostly digital realm; they help provide a distraction from the exhausting glow of the computer’s screen and focus your attention into something real. At the very least, they will help you move more fluidly throughout your software, help facilitate decisions, and generally reduce the time spent not playing music.

MIDI/USB

MIDI is how controllers talk to your computer – here is a MIDI cable and interface, as well as USB, which can also handle MIDI.

There are a few different types of controllers, each one having different purposes and powers. Almost all controllers communicate with a protocol called MIDI, and thanks to the evolution of technology, they are now able to communicate through a USB connection rather than with a special MIDI cable and interface. MIDI messages, sent by controllers, tell electronic instruments and software what to do (such as which notes, what tempo, etc.) and allow you to be more expressive with your computer. The style of music you would like to make or how you’d like to make it will determine which controllers are right for you.

Keyboards

MIDI Keyboard

This M-Audio Keyboard has 49 keys and can connect with both MIDI cables and USB.

Keyboards are the electronic version of the piano, and probably one of the only controllers that resembles a traditional instrument. These generally come with 49 keys (four octaves) and are an amazing tool for songwriting and getting musical ideas flowing. If you have experience with playing piano or just need some sort of peripheral device to start with, then these are probably your best bet. I think a MIDI keyboard should be considered by anyone making music with a computer; they’re fun to play and are a great starting point for the creative process. Also, pretty much any MIDI keyboard is compatible with any software you can find, making them extremely reliable and easy to use.

Examples: Akai Pro LPK25, M-Audio KeyStudio, Alesis Q49

Drum Pads/Grids

Drum Pad/Grid Controller

The Novation Launchpad is a grid controller consisting of 64 back-lit buttons.

These types of controllers don’t really do anything that a MIDI keyboard can’t, but they do provide a different sort of feel and tactile feedback that is very important. They usually consist of rows of rubber pads that can be used to control drum machines, activate samples, or do almost anything you assign to them. Many of the newer types of these controllers also have LED lights behind the pads to give the user more information or to serve different functions. Drum Pads were designed for – you guessed it – playing drums, but some artists have began using them to play their music in original and creative ways. It’s really up to the musician’s imagination to figure out how they want to use the power of these controllers.

Examples: Akai Pro LPD8Novation Launchpad, Akai MPD-32

Mixers

Mixer

The Novation Nocturn has 8 knobs, 16 buttons, and a cross-fader that can be assigned to whatever you’d like.

There is a lot of variation within this type of controller, but each one generally consists of two things; knobs and faders. These are designed to control the volumes of different sounds, modulate effects, or do anything else that makes sense to control with faders and knobs. Just like with drum pad controllers, there is a lot of potential for creativity with mixers – they are rather simple but will provide you with a lot of control over your music – it’s up to you to harness it.

Examples: Korg nanoKontrol, Novation Nocturn, Behringer BCR2000

Hybrids

It is also important to note that there are controllers that fit into a couple of these classifications. It’s not uncommon for the higher-end MIDI keyboards to have drum pads and/or mixers on them as well. There are also many drum pad controllers that come with a bunch of knobs to fiddle with and a built-in mixer. These types of controllers are almost always more expensive than their simpler counterparts, but perhaps they might be a good investment if multiple types of controllers fit your style.

Examples: Akai Pro MPK mini, Akai MPK 49, Akai APC40

Take Your Pick

So these are the three types of MIDI controllers – keyboard, drum pad, and mixer – that make up the basic varieties that you can buy for making music with on your computer. It has also become very popular for the more tech-savvy musicians to create their own controllers to produce and perform with using available hardware and materials. The Monome is an example of a great independently-made controller, and it has even been adopted by large electronic acts such as deadmau5, Pretty Lights, and Sound Tribe Sector 9.

Controllers are what make producing electronic music fun; they are the instruments and tools of the digital musician. Try many different options, and think about which controllers inspire you the most or take care of your musical needs and desires. Finding which one (or combination of a few) that works best for your style is crucial to having an enjoyable and creative time while making music. Now take control of your studio!

Give Your Studio Some Life

So we talked about some great options for software to help create music with, although the digital audio workstation is just one (albeit important) tool that is used in producing digital music. The DAW is the heart of a digital studio rig, but it requires some peripheral devices to come alive and be able to get sounds in and get music out. Here’s a concise list of some hardware needed to complete a basic studio setup:

Audio Interface

Native Instrument's Audio Kontrol Interface

Native Instrument’s Audio Kontrol Interface allows for capturing microphones, guitars, and many other things to be used in your computer.

An audio interface is the first step and the most important part of building a digital studio. The interface is where a guitar, microphone, or any other audio source meets the digital realm and is converted into streams of bits that a computer can work with. This is also where a digital audio source will be converted back into analog when you want playback through speakers or a set of headphones. An audio interface’s job, in a nutshell, is to help you move quickly and seamlessly between digital and analog audio and is a key component to producing music electronically.

Cables

Audio Cables - USB, TRS, and XLR

Three types of audio cables – USB, TS, and XLR (shown left to right) will connect many devices to your audio interface or computer.

If a DAW is the heart of the studio, then the cables are definitely the veins and arteries carrying sound signals to and fro. Quarter-inch (1/4”), unbalanced TS cables (“Tip-Sleeve”) are the standard, and they are the normal guitar cables that you see everywhere that can hook up to almost anything. There are also balanced TRS cables (“Tip-Ring-Sleeve”) for running mono signals (Mono vs. Stereo) that are generally more expensive, but will help combat interference and extra noise from being added to your signals. In some cases, RCA cables (the ones with the multi-colored hookups) can be used but are not the norm. XLR is another common type of cable, although microphones are usually the only major device that utilizes this type as a means of communication. USB is becoming more trusted as well, and it has an advantage because it can hook up directly to the computer without the need for an interface. So in short, TRS cables will almost always be needed, but depending on the devices you are using you might have to get some others. It’s a good idea to start building a collection of various cables and converters that will save you some frustration later if they’re needed.

Headphones

Sony's MDR-V6 Headphones

Sony’s MDR-V6 Headphones provide excellent sound reference for your productions with an over-the-ear design.

Headphones will act as your ears’ main connection to your computer, so it is important to invest in a quality pair. It isn’t a good idea to use in-ear phones for many reasons (low quality, leaking noise, etc.), so getting a pair that has cushions and covers your entire ear is the best choice. It is extremely important to look for “studio” or “monitor” headphones, and be wary of Beats by Dre or other Hi-Fi headphone brands – they embellish audio signals and won’t provide you with an accurate depiction of the sounds you are creating.

Monitors

KRK Rokit reference monitor, side-mounted.

This KRK Rokit is an example of a reference monitor that will help you hear how your music behaves in space and at high volumes.

Reference Monitors” is the term for speakers that are used in studios and for music production. They are different from average speakers in the same way that studio headphones are from Beats; they output a pure representation of what is input, without any embellishing or equalizing for better quality. Headphones are excellent for hearing all the details of your productions, but monitors will allow you to hear how they sound out in the open and in space. Most songs are meant to be played through speakers at some point, so knowing what your music sounds like when it is played out loud is very important.

Microphones

MXL 990 Condenser Microphone

An example of an affordable microphone – the MXL 990, shown here with a pop filter.

A microphone will allow you to put sounds directly into your computer, whether it is your voice, an acoustic instrument, or any other source of sound. There are a few major types of mic’s that are used for recording music, including cardioid, dynamic, condenser, and ribbon microphones, but dynamic and condenser are the most commonly used and available. A dynamic mic is one that is generally used for performing live because of its stability and durability, while a condenser mic is more fragile and commonly used for recording in professional studios. It is important to note, as I have recently learned, that each type of microphone can be used for recording depending on how you want to utilize the existing strengths and weaknesses. Each type of microphone has its own unique characteristics that will process sound and add certain qualities to it, so finding the right microphone for the job can be an art. Trying as many microphones as you can get your hands will help you find what works best for you and helps shape the sound that you’d like to make. Depending on what type of music you are interested in creating, a microphone may not be necessary, but it can still be a useful tool for adding small elements to your music. Some professional-quality microphones can go into the thousands of dollars, but there are also kinds that can be bought for less than $100 and are still high-quality (some even connect through USB and don’t need an audio interface/mixer).

Mouse

USB Computer Mouse

A USB mouse can easily be attached to a laptop and will make working within your software much easier.

A computer mouse almost goes without saying, but I figure that most digital musicians will be using their laptops to produce so I felt that it is worth mentioning. When working in a DAW, it can become frustrating to use a laptop track/touchpad to navigate, and an external mouse will be a much quicker alternative. (Note: As you become more skilled and knowledgeable about the software you use, it will become possible to do almost all navigation without the need for a mouse or touchpad, especially with the assistance of controllers.)

Controllers

Akai MPD32

Akai’s MPD32, one of many controllers that exist for creating electronic music.

Controllers are not a necessary part of a digital studio; they don’t deal with any of the audio signal and don’t provide much functionality that won’t already exist. However, the reason controllers are important is because they help streamline the process of creating music on a computer. Instead of searching for the “play” icon every time you want to get playback, you can press a single button on a controller to do this. Controllers can remove you from the screen and keyboard perspective that quickly becomes dull and uninspiring, and can help free your hands and imagination. A controller, in many cases, is the real instrument in a digital rig and some musicians can do amazing things with them. There is a tremendous variety of controllers available today, and I’d really like to dive into the various options in an upcoming blog post.

It’s Alive!

Quick sketch of a basic studio rig.

Here’s a quick sketch of a simple digital studio (wire connections are drawn in tan).

These are just the basic components of a digital studio environment, and a lot of other various devices can be added into the mix. Like I said in my last post about DAWs, its all about finding what you need, what best suits you, and what helps you get your ideas onto the computer as fluently as possible. Once you find the right combination for your creative process, you might be amazed at how fun and easy it is to make music with your computer. Now get things moving!

Previous Post – Choose Your Music’s Workplace

Choose Your Music’s Workplace

The Laws of DAWs

In this modern age, almost every song or recording that you hear has been processed through what is called a DAW – or a “Digital Audio Workstation.” A DAW acts as a software-based hub for creating music digitally; it allows for recording, editing, and playback of audio and most modern DAWs have very powerful processing tools.

The most popular DAWs being used today include Ableton Live, Logic, Cubase, and Pro Tools, although there are also many other smaller software choices. The latter two of that list are considered “industry standard” and are commonly taught in audio engineering schools and used in professional studios.

Here is a quick run-down of these popular digital audio workstations.

Logic Pro screenshot

Logic Pro screenshot – taken from dannyjlewis.wordpress.com

Logic – Logic Pro was developed by Apple, so as you might guess it is available only for Mac OS. However, many musicians use Mac OS so it is very popular and important to mention. Logic is essentially a professional-grade version of Apple’s free recording software GarageBand, which comes already installed on all Apple computers. Logic Pro 9, the latest version, costs a reasonable $200 and can be downloaded directly from the App Store.

Cubase screenhot

Cubase screenshot taken by Ferran Nogues

Cubase – Cubase 7.0 is the latest iteration of this DAW software made by Steinberg. The Cubase family of products has been widely used since the debut of Cubase 1.0 in 1989. Able to run on both Mac OS X and Windows 7 and 8, Cubase is a very competent choice for whichever platform you use. Cubase 7.0 is moderately priced at $500 and is a great deal considering its capabilities.

Pro Tools screenshot

Screenshot of a timeline in Pro Tools

Pro Tools – Pro Tools is a beastly type of software that was developed by Avid Technology, and it has long been the standard for recording in professional productions. Pro Tools was first created in the mid-80s by a couple Berkeley grads and still remains the go-to DAW for many artists and sound engineers. As a result of its capabilities and widespread use, Avid is able to charge $700 for Pro Tools 10 and up to $2,500 for the HD-equipped version. It’s a huge price tag, but it would be an important investment for anyone interest in doing professional sound design or working in a studio.

Ableton Live screenshot

Ableton Live screenshot – “Session View” allows for designing songs to perform live

Ableton Live – Live is unique DAW created by a company from Berlin called Ableton. It was developed to be used for live electronic performances and has versions that can be run on both Windows and Mac operating systems. It has similar features to the other software described earlier but also has a separate interface for developing music and sounds to be played spontaneously. As a result, Live has been adopted by many musicians who perform their music with the accompaniment of a computer. Ableton sells Live 8 for $450 and is perfect for people that use their computers to make and play music, as well as those who just use them to record.

So…

So here’s a wrap up of the main ideas:

Use Logic if you own a Mac, as it’s affordable and an excellent product for Apple-based musicians. Get Cubase if you want a versatile, professional-grade DAW that can record and edit anything you’d like. Invest in Pro Tools if you want a career in sound engineering or if money is no object. Finally, take a chance with Ableton Live if you want to perform your music and use a computer while you do it.

Whichever software you choose, its all about learning how to maximize efficiency and get your musical ideas onto the screen as clearly as possible. When looking for software to make music with, look for the one that helps you accomplish these things most comfortably.